Friday, February 22, 2019

Love This 12x12 Layout | Shimmerz Paints & Cocoa Vanilla Studio

Hi Shimmerz Fans!

Nicole here today with a fun, colorful, easy layout to share with you!
Today's project was inspired by the tiny floral die cuts in the Cocoa Vanilla Midnight collection. I loved them so much that I had to paint larger versions! Here's a quick look at my final project:


I began by prepping my page with white gesso. I coated most of the page because I wasn't sure how many flowers I was going to paint. I eventually ended up just paining a row of them along half of the page. I used Creameez Cheeky Pink and Berry Hot and Coloringz Pink Stilettos and Ahoy Matey to create them.  I really didn't put a whole lot of thought into it. I just made sure some areas of the flowers were lighter than others or combined two colors.  When my colors were dry, this is where the thought came into play.  I grabbed a black fine line sharpie and sketched what I thought was my best representation of the floral ephemera. The lines were on the darker side and some of them were even a little lopsided, so I decided to go back in with a black gel pen that had a thinner line thickness and go over it again. This time, I tried to keep the line in the same general area as the first, but not exact. Once the flowers were drawn, I did add a few splatters so the background wasn't so stark white.


After all of my paint was dry, I set my photo in the general area that I was thinking of placing it, which is actually where it ended up staying! (That doesn't happen all that often for me lol!) I then strategically placed all of the floral ephemera exactly where I wanted it and popped it up on foam squares. After that, I added in a few other bits of ephemera and a couple clear and puffy stickers.

In the end, it felt like it was missing something along the right and top sides. There was just so much white space that it bothered me, even though it was the look I was going for. I decided to use the same three colors of Shimmerz and paint a piece of scrap cardstock to create my own watercolored boarder that matched the rest of the layout. I adhered that along those edges and called this layout done! It really came together quite quickly! Here are a few close ups of my final project:


Here is the list of Shimmerz that I used for this layout:
Creameez Cheeky Pink
Creameez Berry Hot
Coloringz Pink Stilettos
Coloringz Ahoy Matey

Thanks so much for stopping by today!

DON'T FORGET! 
Mention my name in the comments section of your next order and get a free surprise product!!


Wednesday, February 13, 2019

Don't Get Your Tinsel In A Tangle | Scrapaholics Chipboard

Hi everyone!

Happy hump day! Today I'm featuring an amazing chipboard piece from Scrapaholics Chipbard!

Yes, I'm doing a holiday travelers notebook layout, but I had the perfect pictures for this piece and I couldn't resist! Better late than never I guess, right?! Here's a look at my final spread:


For the left page of my spread, I kept it very photo heavy because I wanted the right side to be primarily simple so it could feature this beautiful "Don't Get Your Tinsel In A Tangle" chipboard. Seriously, this phrase fit my photo perfectly! My so was so frustrated trying to get his arms around a pencil tree and he was determined to make it work...and he did!

For the chipboard, I coated it with a layer of white gesso and let it completely dry.  Once dry, I added two layers of Shimmerz Paints Spritz in Ruby and Spritz in Caribbean Sunset, making sure the first layer was completely dry before adding the second.  I let this sit overnight so it would dry and not be tacky.  Here are a few close ups of the final spread:


Thanks so much for stopping by!

Be sure to check out Scrapaholics chipboard HERE!


Monday, February 11, 2019

"Love" Layout Featuring Cocoa Vanilla Studio | Shimmerz Paints DT

Hello Shimmerz Fans!
Nicole here and today's project features not only Shimmerz Vibez and Coloringz, but also the new Midnight collection from Cocoa Vanilla Studio.  Midnight has to be my most favorite paper collection ever! When I saw some of the embellishments in the line, I knew I wanted to recreate a 12x12 background that coordinated with all of the embellishments.  When I was working with my mists, I found the PERFECT color combo that matched this collection: Vibez Rose Gold Red, Vibez Pink Moscato and Coloringz Ahoy Matey. Take a look:


Oh my goodness, ya'll! Isn't it perfect!

I created this background very simply. I took a 12x12 sheet of cardstock, added a layer of white gesso and then did 2 layers of the packaging technique and a bit of splattering. The lines left from the gesso after it dried helped to add some texture and lines int he background, which I love! I diluted the color with water quite a bit on the first layer and then got gradually darker.


 After the background was dry, I trimmed it down and then stitched it to the center of a new, clean, 12x12 piece of white cardstock. I roughed up the edges for more dimension. I added my photo and several bits from the Midnight collection, making sure they hung off the center background and also tucked under it, giving the impression of "running off the page." I added my journaling under my photo and called it done! I kept a lot of my embellishments clustered together in a small area so the background could really be the focal point and "shine" on this layout. Here are a few close ups:


The Shimmerz products used on today's project are:
Coloringz Ahoy Matey
Vibez Pink Moscatto
Vibez Rose Gold Red

Thanks so much for joining me today!
DON'T FORGET!!!!
If you place an order in the Shimmerz Shop, be sure to mention my name in the comment section for a FREE-BEE!!!!


Tuesday, January 29, 2019

Forever and Ever Layout | Shimmerz Paints

Hello Shimmerz Fans!

Nicole here and today, I have a fun layout to share with you!
 For this layout, I wanted to keep it minimal with supplies. The holiday's have recently ended and I'm trying hard to save a bit for some of the new products recently showcased at Creativation and a few things on my wish list (so hard!). So for this project, I'm using a couple mists, black embroidery floss and a few random embellishments in my stash. Here's a quick look at the final spread:


I began with a white 12x12 sheet of paper and applied gesso to the entire surface. I then chose a few mists from my stash in different tones of pink and red.  I divided my paper into 9 different sections and sprayed small areas of those colors. I did have to duplicate one of the colors, but that's OK!


When this piece dried, I cut it into squares by color and began to free hand fussy cut "X's" and "O's" in various sizes. I then laid them out over a new sheet of white 12x12 paper to start my layout. Once I knew where I wanted them, I did the "packaging technique" underneath them with the same color of mist. This gave it a nice tone on tone look in the end!  When the background was dry, I glued all the "XOX" in place and did some stitching with black embroidery floss over a few of them.  Once I was done stitching, I built my layers, added by title and embellished with a few bits and pieces from my stash.  Here are a few close ups of my final layout:


Here's a list of the mists I used on today's project:
Coloringz Peachy Keen
Coloringz Pink Stilettos
Spritz Ruby
Spritz Caribbean Sunset
Spritz Cotton Candy
Vibez Razzledazzel Berry
Vibez Rose Gold Red
Vibez Pink Moscato


Thanks so much for joining me today! I hope you've been inspired!
(Don't forget to mention my name at checkout for that free-bee!)


Thursday, January 3, 2019

2018 Year In Review | Shimmerz Paints

Hello Shimmerz Fans!

Nicole here and today I have a fun and VERY colorful layout to share with you!  As 2018 comes to an end, I wanted to do a recap or a year in review type layout. I thought it would be a really fun way to end my album. This layout doesn't have much embellishing, but has LOADS of color! Here's a quick look at the final layout:


For this project, I chose to use a piece of watercolor paper as opposed to 12x12 scrapbook paper for my base.  I knew with all of the colors that it was going to need to take a whole lot of water and paint. I started by choosing a rainbow of colors and ended up going with all mists for this project.  Here is some "eye candy" for the colors I chose:


These are all of the colors I used and the actual order I used them in on my spread. I did not prep my watercolor paper before I began, I simply put my colors in order that I wanted to use them and had my water bottle within reach.  I started by spraying the outer edge of my paper with a single color and gave it a quick mist with water so it formed a color droplet. I moved my paper around to direct that water drop towards the center of the paper.  I continued with this process for every color.  The key for me was to do each color as they were still wet.  I let them naturally bleed into each other.  The only time I took a paper towel to soak any color up was when they all reached the center of the layout and it started to create a muddy brown.  Once dry, I added 1.5" photos in a circular pattern, backed by a color coordinating paper. After adhering them all down, I added in color coordinating heart embellishments, pieces of chipboard that I colored with Shimmerz Coal and my title in the center. For my journaling, I added it around the outside edge of my layout. It created a nice frame and also includes a short description of the photos that I chose every month.  Here are a few close ups of my final project:


 Here's a complete list of the colors I used today:
Shimmerz Paints Coal
Vibez Pink Moscato
Spritz Ruby
Spritz Caribbean Sunset
Coloringz Peachy Keen
Vibes Sunset Strip
Vibez Glorious Day
Coloringz Don't Citron Me
Coloringz Oh Say Can U See
Coloringz Well Blue Me Down
Spritz Sapphire
Coloringz Ahoy Matey
Spritz Walkin' a tight Heliotrope

Whew that's a lot! lol!
DON'T FORGET!  When you place an order over at Shimmerz paints, mention my name during checkout in the notes section for a free surprise color! 

Thanks so much for joining me today!
If you play along, please tag @ShimmerzPaints!


Friday, December 14, 2018

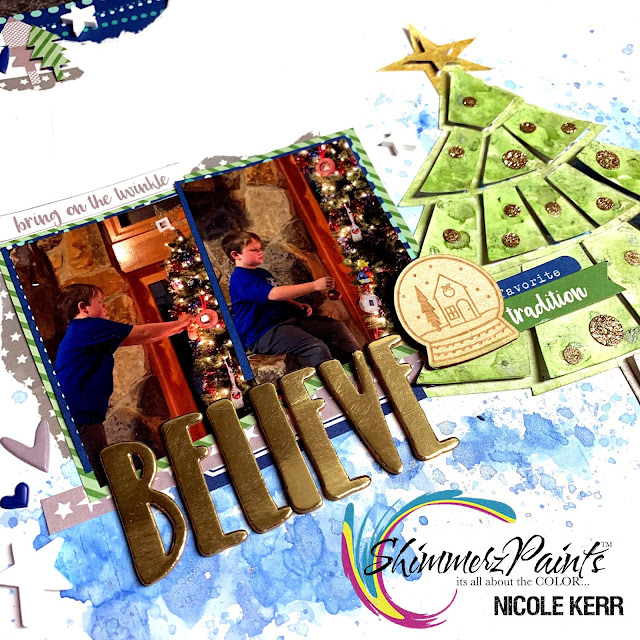
"Believe" Layout | Shimmerz Paints

Hi scrappy friends!

Nicole here and today I have a fun, non-traditional Christmas layout for you! Before I get in to the fun stuff, here's a quick look at my final project:


Lately, I've been on a non-traditional Christmas kick. Don't get me wrong, I love red and green, but sometimes I like something a little different. Today, I have "different" for you!  I used a tree cut file and six different Shimmerz products on this layout.  I first began by creating my background using Vibes Frost Bite, which has the most beautiful gold glitter in it, and Spritz Sapphire. I used the packaging technique on a gessoed background and set it aside to dry.  While drying, I cut my tree. I left it on my cutting mat while I did all of the painting. It was so much easier and it didn't harm my mat at all! I added gesso first, then layered Inklingz Greener Pastures and Honey Do List for the branches, Shimmerz Precious Metal for the trunk and Shimmerz Christmas Cheer for the star.  While all of my layers were drying, I started building my photo layers and added the top bits to my spread.  I used a collection from Elle's Studio this month for all of my papers and most embellishments. The cut file really did all of the hard work adding interest to the layout!  Here are a couple close ups of my final spread:


Here's a list of all the Shimmerz used on today's project:
Vibez Frost Bite
Spritz Sapphire
Shimmerz Christmas Cheer
Shimmerz Precious Metal
Inklingz Honey Do List
Inklingz Greener Pastures

Thanks so much for joining me today!
Don't forget, add my name in the comment section of your order for a free surprise product!